
NO SEW FLOOR PILLOW

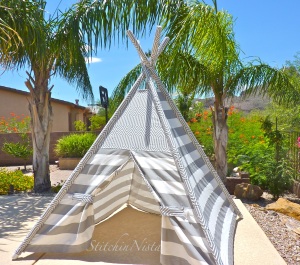
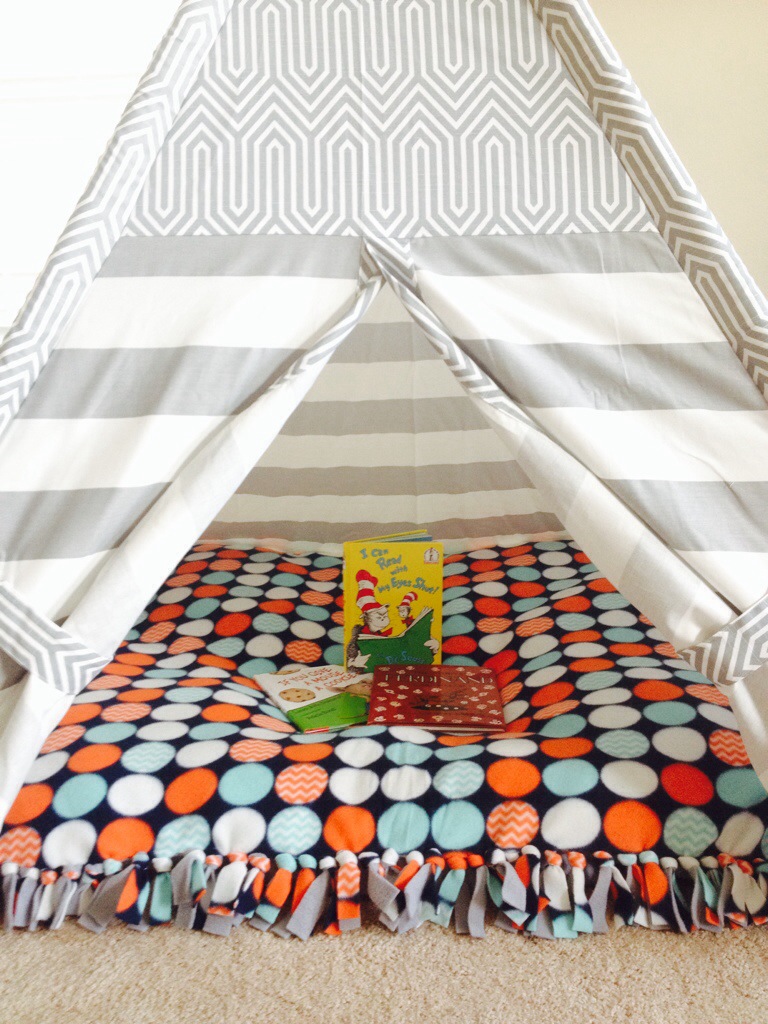
As my oldest son’s second birthday was approaching, I decided that a reading tent was going to be the ideal gift! He can never get enough of his books, and his imagination was beginning to blossom. No better place to read than his own private teepee. In my mind, his gift would include a large, collapsible teepee, a floor pillow to sit inside, and a slew of new books to conquer (always used, got approximately 15 books for $40!). Etsy (as always) was the place to find unique and stylish tents (no Mickey Mouse crap!!). My adorable teepee was bought through StictchinNista at Etsy. She was amazing at helping me design exactly what I wanted in colors and patterns. Check out her shop here: https://
 www.etsy.com/shop/StitchinNista.
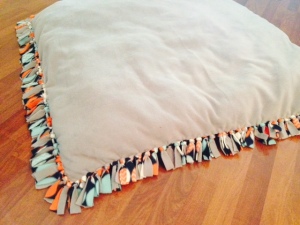
Next, I began to seek a large throw pillow that he could sprawl out on, maybe with me or his father, or maybe a few of his stuffed animal friends. These pillows were atrociously expensive, averaging $100 for the size I needed. I even took the liberty of looking at dog beds, but those run $50 or more. SO – with a little Pinterest inspiration, I decided to make my own. It had to be simple (must be easy enough to enjoy a glass of wine and still have success), stylish (matching the teepee and his room decor), easy (I’ve no sewing machine) and of course, less expensive than what I was finding online. Below is the simple tutorial for a large, no sew floor pillow for reading, lounging, or even for your pets!
1) Find two fleece choices (one print, and one coordinating solid) and have cut to 1 1/2 yards each. Drive home, and pour a glass of wine.
2) Lay the two fleece pieces on top of each other. Be sure that the correct side is outward. Sip wine as needed.
3) Cut through both pieces of fabric, to your desired size and shape. Mine was 55″x55″. NOTE: Your pillow will be approximately 10″ shorter as an end result (so mine became 45″x45″ approximately). You could certainly make any shape including circular or rectangular with a few modifications.
4) Once the pieces are cut to your desired size, cut a 5″x5″ square away from each corner. Toss the scraps, and be sure to sample your wine.
5) Begin cutting fringe pieces across the first edge of the blanket (any side). Roughly 1 1/2″ each. Use a yard stick or measuring tape to ensure that you do not cut the strips more than 5″ in length.

6) Tie the fringe into knots, not too tightly, but do ensure the knots align and close the blanket. Occasionally pull the blanket taut, so that it lays flat and does not gather.
7) Continue cutting and tying knots on sides #2 and #3. Refill wine glass.
8) On the final side, cut all fringe. Begin tying the knots, but leave approximately 15-20 knots untied in the middle.
9) Stuff the open space with polyfil. I used 32oz, but it certainly could have taken more for a firmer pillow. Be sure that you are stuffing into all corners and to each side. Pull the polyfil apart and fluff it up before inserting. Occasionally, shake the filling around for even distribution. Sip wine.

10) Finish tying the knots to close the hole. VIOLA!

This project took me approximately 2 hours (I was learning as I went. I could maybe knock one out in 60-90 minutes now). I paid about $9 for the print fleece, $9 for the solid fleece, and $5 for the polyfil. This project was $23. I think I paid more for the bottle of wine!! Be sure to take coupons with you to your favorite craft store. I bought my items at 40% and 50% off. I even saw no sew fleece kits at $10 (not my taste in patterns). You’d still have to buy the polyfil stuffing, but that is a $15 LARGE floor pillow. I look forward to my son’s birthday next month – I’ve got to contain myself, to not let him enjoy his gift earlier.
Cheers & happy crafting!


great
Thanks😉
what a great idea………..I must be dense. I understand all of your instructions except for the need to cut out a 5 x 5 section of fabric in each corner. If you could clarify, I would be grateful..Can’t wait to make a couple of these!!!! Thanks, Joanna
Thanks for stopping by! Here’s an image I found on Google (not my image), that helps to show you what I mean!!
https://goo.gl/images/oB7uL4
Fantastic idea, will definitely be making this – currently reading this whilst drinking w,I expect —- halfway there already!!
You’ve pretty much mastered the project then! Cheers!
An expert!!! 😉
What are the measurements and instructions for making the oval pillow?
I’ve never made an oval shape. But I think it would be very easy. Just cut 2 pieces of fleece, any size you need, plus 10″. Then, with the two pieces layered on top of each other, cut 5″ fringe all the way around. Tie them off, leaving a few undone. Stuff. Then tie the remaining pieces.
The oval shape baby pillow is what drew me to the project, so why no instructions (specific ones) I need the measurements. I don’t know what size I need, that is why I clicked on the picture of the baby pillow, to get instructions.. not a huge child pillow for a tent. but thank you anyway.. can you give me aprox. size?
So sorry Deb! . You may have clicked the link from another website, which took you to my page. I’ve seen that oval pillow too. But it is not my work, nor on my personal blog.
My best guess for an oval baby pillow may be 30″x20″? However, I don’t personally advocate this type of pillow for infants.
I’m curious, did the stuffing come out? I have made a few no sew blankets in the past, but I would think the stuffing would come out a bit, especially with a kid playing on it. Let me know if you have seen any stuffing coming through the edges!
Nope! 2 years later, no stuffing has come out! The pillow has certainly flattened a lot though.
I just made a few floor pillows for my teenage surrogate granddaughter for her room and I actually sewed the edges but my experiment was to use regular size pillows for the stuffing. So I purchased 3 pillows for approximately $3 each which was going to be cheaper than the polyfil. It turned out great and no stuffing to come out and I sewed a button in the middle of each pillow to help keep them in position. But now I think I’ll try your method of the tie blanket but still use pillows. Who knows it might just be the perfect combination!
I love that! And, would also make it easier to wash, just by untying a few knots! Thanks for the tips!
Pingback: DIY No Sew Floor Pillow Bed - Trending Posts
hi! I plan to make this once I get all the materials later this week. I have one question though, you say to tie the fringe into knots, but not too tightly.. why is that?
I think the knots are cuter, with a nice square knot! If you tie too tightly, it loses that nice bulby-looking knot. Also- should you ever want to open it up and restuff it, keeping the knots looser will help. Thanks for the good question!
Using the polyfil how do you clean pillow.
As is, it can be spot cleaned with a warm damp cloth. We are sure to avoid any food/drinks with it. You could always untie a few knots, remove stuffing, and wash. Then add new stuffing.
AWESOME IDEA I’M SOOOOO GETTING SOME WINE oops I meant doing this project.. I was wondering too, how you would clean it.. Great idea Thank you
Lol! 🍷
Just spot clean. If you are feeling it needs to be washed, you’d have to untie a handful of knots, and remove the stuffing. Wash on cool/gentle and low heat dry. Restuff with new stuffing!
Pingback: No Sew Flooring Pillow – XmasGive.com – Bedding Ideas
I like the pattern of your fabric. Where did you get it?
I bought it JoAnns, over two years ago. They have lots of great fleece choices in the fleece by the yard section!
What are the washing instructions? Brightly colored fabrics chosen, but not sure if color bleeds in wash. Any advice?
I’d recommend washing the fleece prior to use. If you are concerned with color bleeding wash on cold with a a Shout Color Catcher! They work very well. 🙂
Otherwise, once the project is complete, it’s just spot wash with wash cloth, warm water, and mild soap.
What keeps the stuffing from bunching up in one spot?
I haven’t had this issue. Ours is 2 years old! But it has flattened a lot.
I suppose just shake it out every now and then to redistribute the stuffing.
Just wondering why you don’t advocate to use oval shape for an infant. It has been several years since I had an infant but wanted to make this for a friend who is expecting … but maybe now I won’t. Thanks for reply!!!
Shape is not the issue! Infants should not be sunken into a pillow type bed. Too many risks of suffocation!
I agree that babies aren’t supposed to use pillows, however I made one for my last baby. I believe in attachment parenting so my kids tend to nap on me during the day I liked it for the idea that if I had to get up to go to the bathroom or feed my other kids I might not wake him up setting him down for a couple of minutes if he was in one of those pillow sleeping bag things. I barely used it, and the few occasions he was in it I was right there and awake so he was supervised. It’s largely a matter of just being safe about it.
Pingback: 24 DIY Dorm Decorating Ideas a Broke College Student Can Afford | Make Money Online With SweetSours
Can it be washed?
Spot washed. If you wanted to untie some of the knots and remove stuffing- then you could wash. Maybe just for extreme need.
Is this large enough for your little one and you to read on? I am looking for something large enough for the two of us to fit on.
I’d say yes! It’s not as long as an adult, but plenty big for two to snuggle up on. 🙂
Pingback: 39 Swift Und Wahnsinnig Spaß DIY-Zelt Für Kinder – Haus Deko
Pingback: 39 Swift and Insanely Fun DIY Tent for Kids - The Veranda of ideas
Loving this idea. Think it is just what I need to make for my camper van fold out bed to give a little extra comfort. Might try putting some foam in it instead though. Slainte
Great! Let me know how it comes out!
Pingback: 10 DIY Floor Ideas | Finest 10 Ideas
So i completed this tonight. I know your recommendation was for 32oz of polyfil, but in my planning, i was concerned that was not enough to ensure a soft pillow that didnt touch the floor when someone sat on it. I ended up using 3 32oz polyfils, and although the pillow looks massive, when its laid on, its perfect and doesnt poof up too much around the person in it. I will watch for it to make sure stuffing cant be pulled out between the knots (darn kids)
If i made another, i might try foam as well!
I agree! More polyfil is better! Would love to know if foam is the trick!
Gotta start with “I FREAKING LOVE YOU!!!!” …not only is this so doable for all the kiddos it’s actually in the perfect price range. With the head maintenance technique you provided was the extra helpful hint that I think we all need it
Lol! Thanks for reading!!! Cheers!
Pingback: 15 Awesome DIY Floor Cushions and Pillows - Cool DIYs
Pingback: Make Your Own Floor Pillows
This is absolutely perfect for my girls tent! Going to try it this weekend!! I have the wine – off to the fabric store with coupons (you and I think alike!) 🙂
They’ll love it! And it’s fun to make. Cheers!
Hi! I know this post is from a few years ago but I was trying to figure out what type of knots you use? They look awesome and they don’t look as bulky as just doing a double knot like a lot of people do. Thanks!
Oh goodness! No idea the name of knots…? Over, under, around and through….twice!
Absolutely love this easy peasy idea. I’m planning on making one for each grandchild and also for our cats as they don’t like to share! Heading out to buy the wine … I mean material … right now!
Wine is THEE most important item to get. Happy crafting!
How much did you pay for the Teepee
It’s been a while, but I think around $160. Stitchin’ Nista on Etsy, if she’s still there- did an amazing job! My kiddos still use it almost daily!
Pingback: 10 DIY Baby Gifts | Baby Chick
Was wondering if you think KnIt would also work ?
Knit fabric by the yard? I don’t see why not. But I do anticipate it would fray. Fleece does not fray! Good luck. 🙂
Do u have to use fleece? Or another fabric will be ok
I think most fabrics *could* work. However, they will likely fray – fleece does not fray.
I was just wondering where you purchased your poly fill for that price? I am in Canada so that may be a part of it but it seems WAY more expensive here ( 8$ for only 8 oz). Lets pray for cross boarder shipping!
I believe I purchased it at Joann’s!
Pingback: 22 Easy DIY Giant Floor Pillows and Cushions That Are Fun And Relaxing - DIY & Crafts
Pingback: 22 Straightforward DIY Large Flooring Pillows and Cushions That Are Enjoyable And Enjoyable - Beauty and healthcare
This is amazing! I’m totally doing this!!!
Thanks for reading! Happy crafting!
Pingback: 15 Comfy DIY Floor Pillows and Cushions - Style Motivation
Pingback: meet darci
Pingback: meet darci
Pingback: Crafting at Home: 27 Fleece Projects for Kids Of All Ages
I just made 2 of these for my girls for Christmas gifts. Super easy and cute!! I did have some foam laying around so I put that in the bottom and put polyfill on top for some extra fluff! It is perfect!! Thank you for the great diy
I’m so excited to hear it was a success for you! I know your girls will love them. Nice thought with the foam too! Cheers Christie!
I loved your tutorial! Looks great . . . I’ll drink to that!
Cheers!!!
Cheers!!
Just made one for my daughter and it looks fabulous! Saved myself LOADS thank you so much !
Awesome to hear!!! I know she’ll love it!
Pingback: No Sew Projects To Make and Sell - Cassie Smallwood